A long time ago, looking for tips on Color Theory, I came across this blog http://aperturequiet.blogspot.com/2007/01/john-ks-animation-school-revisited.html . It seems to be basically a whole book online in blog form about Character construction, Character animation, Color theory and and composition. I think it's something nice to read on top of The animator's Survival Kit by Richard Williams, and the Elements book by Joseph Gilland (How to approach 2d special effects). That link is to the Element's blog. Great stuff to check out there.
Over the summer, it's a good idea to refresh yourself on what you have learned over the last three years of school.
Friday, April 24, 2009
Wednesday, April 22, 2009
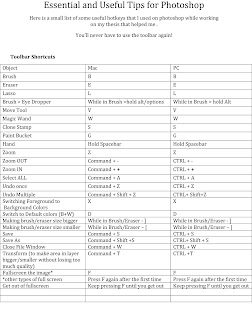
Helpful Photoshop hints from Sandy Hong
So today after I attended an ASIFA-EAST event on the state of New York animation, I was tipped by a 3rd year that some of my classmates were going their own event back at the dorms about preparing for Thesis year. I had to see what they were doing. When I got there I noticed that Sandy had created a beautiful handout sheet on tips to work with Photoshop. There was another short cut key stroke table for Flash. I'll ask teh person who made that one if I can post it later. Anyway, I asked Sandy if I could post it and she gave me the raw files. So the best way I can, I'll show you what she gave me :3 ~Carly
 AUTOMATE
I think this is the easiest and the most USEFUL tip I’ve ever learned. It saved me time, and definitely stopped me from getting arthritis.
What Does Automate do?
EVERYTHING except animate or color…or erase for you. (okay well not EVERYTHING, but it can do a lot) What I used automate for was, when I scanned my animation, they were all scanned in sideways, so I had to flip them ALL over to the correct way. With a click of a button, it did it all for me.
So here’s how to set it up.
This is an example for flipping AND saving an image.
HOW TO SET UP AUTOMATE
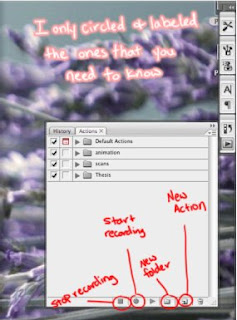
Go to the Actions toolbar (located on the left. OR you can go to Window in the menu and click Actions)
It looks like this
* IMPORTANT!!!!! You should have an image that is already saved on your computer opened in Photoshop so you can use it to set up the action when you first do this! This is crucial!
1. click on the folder button and label it “THESIS” (so you’ll know what folder you have to look for IN CASE you make other folders for other things.)
2. click on “create New Actions” and a new action window will pop up. Label the name Flip + Save and on SET: it should be in the Thesis folder that we made in step 1.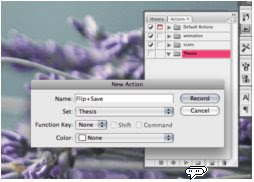
3. Click record, and everything you do from now on will be recorded. So be sure not to be opening and click on whatever the hell you want to. Because it’ll automatically do everything you do when you decide use automate.
4. So here is my “setup image” (isn’t it beautiful?)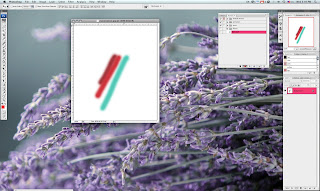
a. Okay while its recording go to IMAGE > Rotate Canvas and depending which way you scanned your files, flip it to the correct direction. Mine was scanned over to the right, so I rotated the canvas 90 degree CCW (counter clockwise). You’re image should flip over and it should be recorded.
This is what it should look like afterwards: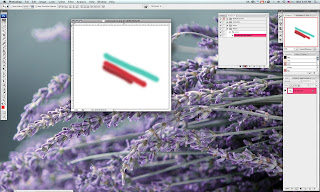
5. Now save your file (not SAVE AS, automate isn’t smart enough to label your images, so what I did was just save over the original image by just saving it you should prac tice using those hotkeys anyways)
a. Your image will be saved and reco rded. You can check the actions list to see what’s being recorded. 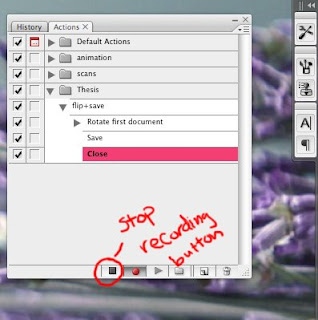
6. now close the image and that should also be recorded in the actions.
a. This is important! > now you need to STOP the action so it won’t record anymore. You do this by click on the stop playing/recording button.
Done! You’ve successfully finished setting up and creating an action!
HOW TO USE WHAT YOU’VE SET UP!
Now that you’ve set up the action, this is how you actually use it. (Finally) Hopefully, (No actually you BETTER organize all of your animati on into scenes and then into layers and put them into folders or I’ll have to come bac k to SVA and kick your ass.) Because this process will end up in a HOT mess if you don’t.
1. Go to File > Automate > Batch 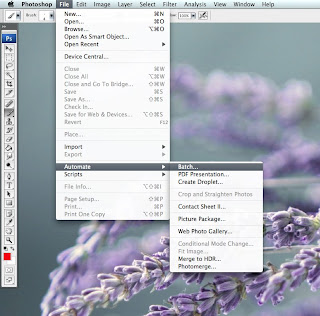
2. It will open a window labeled Batch.
a. Now click on set > Thesis (like how you labeled it when we were setting up)
b. Then click on Actions > flip + Save
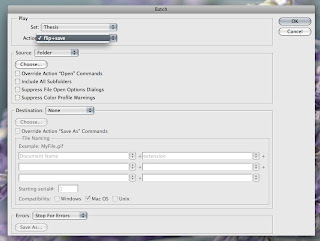
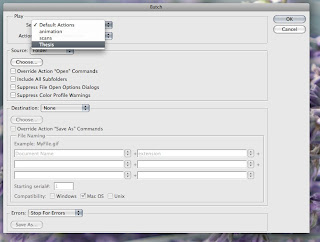 3.There’s a button that says “Choose”. Click it and choose the folder that the scanned images are in.
a. You can also click “include all subfolders” if there are folders inside the folders and you want those to have.
4. Click “OK”. Watch and have a religious experience.
It’ll flip and save ALL the images you scanned in and while it’s doing this, you can sit back, eat a cookie, watch some Youtube, take a shower (if you end up having a lot of files).
This was especially helpful when you have tons of files/layers.this JUST to flip images. You even add the action of shrinking down an image.
Repeat steps 1 -3 and on step 4, you can either add another action there or even start a completely new action. It’s really up to you.
If you’re unsure if you did the set up correctly, you can always do a test run.
Helpful Hints on COLORING
Ever started coloring an image with multiple colors, and started to worry that you’re going to color over another color? Ever hated making new layers for each color?(it makes the file 10 times bigger when you have a lot of layers)
I’ll show you an easy way to color using only 1 separate layer. Yes I said it, only ONE separate layer. This is not black magic or tricks and illusions.
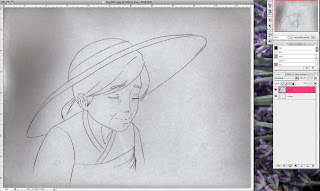
1. I opened up an image. And I unlocked the image (by double clicking it) and putting it on the layer setting of Multiply.
2. While on the brush tool, you’ll see on the top-left corner under the photoshop menu bar, this toolbar: Where it says mode: it on “Normal” by default.
3. Click on the menu where it says “normal” and a drop menu will pull down. There’s an option that says “Behind”. Click on it.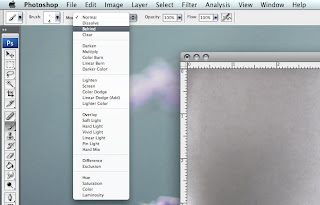
4. Begin coloring your first color on the image. When you move on to the next color, you’ll notice that it won’t go over the previous color because it’s coloring “BEHIND” that.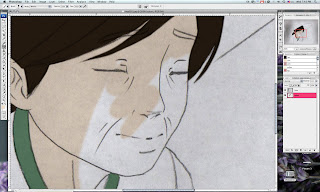
Tips and Hints using the Behind Brush tool
- I would color some areas and leave the bigger areas for the behind tool.
- (I.E) in the image above, I colored the hair and the green collar, and then I would use the behind tool to color the skin the shirt and the hat, so I can just color over without worrying about not coloring the green collar, or the skin.
- Think of it like coloring it cell style.
What you sacrifice doing this:
You sacrifice nothing except for the fact that you should make certain parts neater the first time around. You can always erase, but then it’ll erase what you’ve colored on that layer.
Play around with it. It’s pretty easy to use and get around with. Instead of erasing you can always go back to normal brush and brush things over.
How to use the CLONE TOOL
The clone tool looks weird, and it can be confusing to use at first, but once you get the hang of it, it can be a useful tool to use when you’re cleaning up your animation.
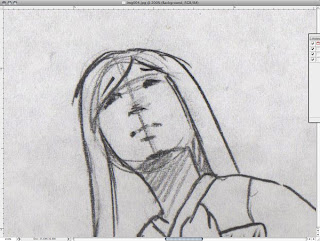
1. open up an image you want to clean up (like dust, scratches, and even messy drawings)
I marked all the areas that need to be cleaned using the clone tool.
2. using the clone stamp tool, press and hold ALT (for mac/pc) you’ll notice that you’ll get what looks like a bulls eye. Now select an area NEAR (this is important) the area that needs to be cleaned. (I can’t screen capture the mouse, but this is what it looks like)
what this did was it captured the texture and area of where you clicked. You can let go of the ALT button and begin cleaning the area. You’ll see a cross hair scanning the area you clicked on when you begin cleaning up. That crosshair is important because that’s what it’s essentially copying over the mess.
I’ll show you a more complicated example.
I drew in crosshairs to mark the face and forgot to erase it. The way I cleaned up the face was by click in the area where the cheek is located used that base to cover up the cross hairs. But then you’ll come across this problem…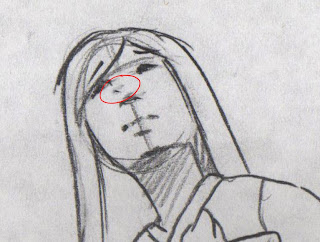
What happened was that it started to copy the area of the nose and this is because, as you’re cleaning you’ll notice a crosshair that moves around as you’re using the tool. The crosshair is there to indicate what area you’re copying. So as it moved, the cross hair copied the nose and is putting the image of the nose that it’s copying onto the area I’m cleaning. This is bad! What do you do?
Easy.
As you’re cleaning, go back and make another copy (by pressing and holding ALT) to the clean area again. This will reset the clone to copy the area again as you’re moving to different areas of cleaning.
This is the before and after picture of the clean up process.
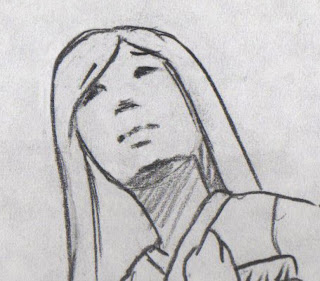
Before After
The reason why I say that you should copy the AREA you’re cleaning is because when you copy from a different area changes the colors slightly and you’ll notice where you’ve used that damn clone tool. This will make you look like a lazy ass and plus its messier looking.
I’ll show you what I mean…
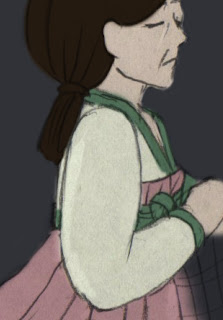
look at the left side of that arm. And the face. Doesn’t that make you cringe? This person might not have noticed it when they cleaned up, but it definitely showed through when they colored.
This looks BAD. You might think “oh it’s just one frame, it’ll just pass and no one will notice.”
WRONG. You WILL notice and the AUDIENCE will notice. They’ll cringe and knowing SVA, we’re picky, and we like to point out all the flaws. TRUST ME. People will notice. Don’t be that person who made the film where everyone says “oh yea his/her film! Nice animation, but BAD CLEANUP.” It can ruin your film.
Things to think about when making your film
Okay. So I’m not going to be the one to tell you to do this or do that to your film. ITS YOUR FILM! Have fun with it! When will you ever have the time to make another and have it shown in a full theater? (not saying you won’t)
All I really have to say is, don’t make your thesis film based on these facts.
1. it’s easy. I’ll get it done faster.
2. Well, I like fighting montages.
3. Omggggg I w4nt t0 m4k3 z3 f1lmz ab0u7 mai interweb r0l3pl4ying frenzzzzzz (I think my spell check just freaked out on me)
4. Inside jokes.
Challenge yourself. Make something or make it by using something you don’t think you’ll be able to do again. It might take longer, but the end result will be more gratifying.
 AUTOMATE
I think this is the easiest and the most USEFUL tip I’ve ever learned. It saved me time, and definitely stopped me from getting arthritis.
What Does Automate do?
EVERYTHING except animate or color…or erase for you. (okay well not EVERYTHING, but it can do a lot) What I used automate for was, when I scanned my animation, they were all scanned in sideways, so I had to flip them ALL over to the correct way. With a click of a button, it did it all for me.
So here’s how to set it up.
This is an example for flipping AND saving an image.
HOW TO SET UP AUTOMATE
Go to the Actions toolbar (located on the left. OR you can go to Window in the menu and click Actions)
It looks like this

* IMPORTANT!!!!! You should have an image that is already saved on your computer opened in Photoshop so you can use it to set up the action when you first do this! This is crucial!
1. click on the folder button and label it “THESIS” (so you’ll know what folder you have to look for IN CASE you make other folders for other things.)
2. click on “create New Actions” and a new action window will pop up. Label the name Flip + Save and on SET: it should be in the Thesis folder that we made in step 1.

3. Click record, and everything you do from now on will be recorded. So be sure not to be opening and click on whatever the hell you want to. Because it’ll automatically do everything you do when you decide use automate.
4. So here is my “setup image” (isn’t it beautiful?)

a. Okay while its recording go to IMAGE > Rotate Canvas and depending which way you scanned your files, flip it to the correct direction. Mine was scanned over to the right, so I rotated the canvas 90 degree CCW (counter clockwise). You’re image should flip over and it should be recorded.
This is what it should look like afterwards:

5. Now save your file (not SAVE AS, automate isn’t smart enough to label your images, so what I did was just save over the original image by just saving it
a. Your image will be saved and reco

6. now close the image and that should als
a. This is important! > now you need
Done! You’ve successfully finished setting up and creating an action!
HOW TO USE WHAT YOU’VE SET UP!
1. Go to File > Automate > Batch

2. It will open a window labeled Batch.
a. Now click on set > Thesis (like how you labeled it when we were setting up)
b. Then click on Actions > flip + Save

 3.There’s a button that says “Choose”. Click it and choose the folder that the scanned images are in.
a. You can also click “include all subfolders” if there are folders inside the folders and you want those to have.
4. Click “OK”. Watch and have a religious experience.
It’ll flip and save ALL the images you scanned in and while it’s doing this, you can sit back, eat a cookie, watch some Youtube, take a shower (if you end up having a lot of files).
This was especially helpful when you have tons of files/layers.this JUST to flip images. You even add the action of shrinking down an image.
Repeat steps 1 -3 and on step 4, you can either add another action there or even start a completely new action. It’s really up to you.
If you’re unsure if you did the set up correctly, you can always do a test run.
Helpful Hints on COLORING
Ever started coloring an image with multiple colors, and started to worry that you’re going to color over another color? Ever hated making new layers for each color?(it makes the file 10 times bigger when you have a lot of layers)
I’ll show you an easy way to color using only 1 separate layer. Yes I said it, only ONE separate layer. This is not black magic or tricks and illusions.
1. I opened up an image. And I unlocked the image (by double clicking it) and putting it on the layer setting of Multiply.

2. While on the brush tool, you’ll see on the top-left corner under the photoshop menu bar, this toolbar:
 Where it says mode: it on “Normal” by default.
3. Click on the menu where it says “normal” and a drop menu will pull down. There’s an option that says “Behind”. Click on it.

4. Begin coloring your first color on the image. When you move on to the next color, you’ll notice that it won’t go over the previous color because it’s coloring “BEHIND” that.

Tips and Hints using the Behind Brush tool
- I would color some areas and leave the bigger areas for the behind tool.
- (I.E) in the image above, I colored the hair and the green collar, and then I would use the behind tool to color the skin the shirt and the hat, so I can just color over without worrying about not coloring the green collar, or the skin.
- Think of it like coloring it cell style.
What you sacrifice doing this:
You sacrifice nothing except for the fact that you should make certain parts neater the first time around. You can always erase, but then it’ll erase what you’ve colored on that layer.
Play around with it. It’s pretty easy to use and get around with. Instead of erasing you can always go back to normal brush and brush things over.
How to use the CLONE TOOL
The clone tool looks weird, and it can be confusing to use at first, but once you get the hang of it, it can be a useful tool to use when you’re cleaning up your animation.
1. open up an image you want to clean up (like dust, scratches, and even messy drawings)

I marked all the areas that need to be cleaned using the clone tool.
2. using the clone stamp tool, press and hold ALT (for mac/pc) you’ll notice that you’ll get what looks like a bulls eye. Now select an area NEAR (this is important) the area that needs to be cleaned. (I can’t screen capture the mouse, but this is what it looks like)

what this did was it captured the texture and area of where you clicked. You can let go of the ALT button and begin cleaning the area. You’ll see a cross hair scanning the area you clicked on when you begin cleaning up. That crosshair is important because that’s what it’s essentially copying over the mess.
I’ll show you a more complicated example.

I drew in crosshairs to mark the face and forgot to erase it. The way I cleaned up the face was by click in the area where the cheek is located used that base to cover up the cross hairs. But then you’ll come across this problem…

What happened was that it started to copy the area of the nose and this is because, as you’re cleaning you’ll notice a crosshair that moves around as you’re using the tool. The crosshair is there to indicate what area you’re copying. So as it moved, the cross hair copied the nose and is putting the image of the nose that it’s copying onto the area I’m cleaning. This is bad! What do you do?
Easy.
As you’re cleaning, go back and make another copy (by pressing and holding ALT) to the clean area again. This will reset the clone to copy the area again as you’re moving to different areas of cleaning.
This is the before and after picture of the clean up process.


Before After
The reason why I say that you should copy the AREA you’re cleaning is because when you copy from a different area changes the colors slightly and you’ll notice where you’ve used that damn clone tool. This will make you look like a lazy ass and plus its messier looking.
I’ll show you what I mean…

look at the left side of that arm. And the face. Doesn’t that make you cringe? This person might not have noticed it when they cleaned up, but it definitely showed through when they colored.
This looks BAD. You might think “oh it’s just one frame, it’ll just pass and no one will notice.”
WRONG. You WILL notice and the AUDIENCE will notice. They’ll cringe and knowing SVA, we’re picky, and we like to point out all the flaws. TRUST ME. People will notice. Don’t be that person who made the film where everyone says “oh yea his/her film! Nice animation, but BAD CLEANUP.” It can ruin your film.
Things to think about when making your film
Okay. So I’m not going to be the one to tell you to do this or do that to your film. ITS YOUR FILM! Have fun with it! When will you ever have the time to make another and have it shown in a full theater? (not saying you won’t)
All I really have to say is, don’t make your thesis film based on these facts.
1. it’s easy. I’ll get it done faster.
2. Well, I like fighting montages.
3. Omggggg I w4nt t0 m4k3 z3 f1lmz ab0u7 mai interweb r0l3pl4ying frenzzzzzz (I think my spell check just freaked out on me)
4. Inside jokes.
Challenge yourself. Make something or make it by using something you don’t think you’ll be able to do again. It might take longer, but the end result will be more gratifying.
Rigging a Pencil tester
Well I'm sure you've seen the gigantic pencil testers with the complicated cogs and cranks, hooked up to a lunch box with 3-4 large lights around. It's like another piece of furniture! I've seen my school use camcorders hooked up to lunch boxes instead of these other old looking cameras and put pieces of wood together for the stand. It still was huge and unless you have carpentry skills, I wouldn't condone this. Alas, there are a couple solutions to this. About a few ways I can think of doing it.
Computer is required
Programs that you can use:
Monkey Jam - A PC only but very simple and effective pencil tester program
Premiere - Using the stop motion feature.
Photoshop - Using the animation feature or in conjunction with:
After Effects - A composting tool.
Equiptment that you could use:
Kent Cam Stand superPro (I recommend the one with lights)
MiniDV Cam (Make sure it has the ability to hook into a computer)
WebCam (With legs that grip onto things)
Scanner ( I like Epsons and I'll tell you why in a bit)
Animation disc or pegbars.
Camstand/MiniDV combination
If you want the feel of the studio pencil tester, The Camstand/MiniDV combination is the way to go. I would show pictures of mine, but someone stole the CamStand from my dorm room. Not cool because the one I was using was $100. So if you have one, don't advertise it!
I had gotten my MiniDV from Amazon.com and it took me a couple weeks to get the one I could use because the first one I had to return because it didn't have a plug that I could hook my computer to. So make sure it has an iLink port. Also check if your computer takes a standard Firewire cable or iLink. It's important because you are going to have to go to like radio shack or best buy to get a male to male cable that either has ilink to ilink or ilink to firewire. I ended up with JVC digital video camera with 30x zoom at around $240-260 ( yea I know, I was getting impacient with shopping for lower prices). It came in handy in that trip to Rome!
Now I haven't tried it yet, but I believe, from what I hear, that if you have a miniDV camera like this that you could print to film through Premiere or Final Cut Pro with it. If anyone knows if this is true let me know. I'm probably going to try it out this summer.
Your computer should be able to see the camera with out installation. If It does, you ought to get in contact with customer service or something lol...
The reason why I feel this is one of the best choices is the control you have over the picture. Also if it's too dark and you have the lights that come with the superpro, you have your 45Degree angles to help the contrast further. A lot less frustrating.
The cam stand is about 20 lbs of steel, so you don't have to worry about the camera falling over... but PLEASE DON'T LEAVE CAMERA UNATTENDED! When ever you aren't using it, dismount it. You don't need someone, or yourself or gravity knocking it over for ANY reason!
As for where you would put the paper, you have a couple options. Animation disk or Pegbar. And then you have a couple more options: Light box or none. If you are using a computer and not a lunchbox, the lightbox is not necessary. Mostly because each program has some kind of multiply tool. Unless you are using Premiere, then it is for layered animation.
It's important to have several pegbars. One for your camera, one for your scanner, one for your lightbox and others floating around. The less you have to move them, the better. If you are using a pegbar instead of an animation disk, I suggest breaking up a cardboard box and using one side of the box to tape the pegbar to it. When placing pegbar under the camera, put a field guide in it's pegs and use the LCD screen of the camera to see where you are putting it.
I was using my animation disc in the beginning of the year. because of the foot of the stand, I often stacked DVD covers under the disc. Be careful to not lay animation disc on it's glass but on the rim of the disk. Last thing you need is the glass to pop out.
If it makes you feel better, add some kind of weight and/or duck tape the foot of the stand.
WebCam
The webcam is the cheapest way to go with pencil testing. The only problem is is lack of control of the picture. It's not good at small details and will blur out constantly. The kind of camera you want is the type that can grab things. I have the Logitec QuickCam that holds onto laptop screens. Although I think there are others with more pliable legs. This is because you need the camera to face down. Which means you need to find something that it can hang off of. Unless you can achieve a 90degree angle, your animation will look a bit warped. Duck tape is your friend.
Scanner
The other option is the scanner. MonkeyJam is great for scanner people because it has it's own scanner interface and programs the scanner to a low DPI. So you will notice that it's a bit faster to scan in MonkeyJam then Photoshop. Regardless, it's REALLY slow to pencil test this way. The only up is probably the best quality.
If you have a mac and can't use MonkeyJam, you could use Photoshop.
Scan at 72 DPI as it's just a test, not the actual thing. I've used HP and Epson. The problem you can run into with scanners are scanners that don't remember where they last selected unless you save the setting. The Hp 3-1 is notorious for this. I ended up stealing my dad's Epson Perfection 1250 which is really old but still works very well and fast. (He didn't mind, he figured out that his fax machine could scan lol) Turns out SVA uses a similar model to my own Epson. Candy Kugal of Buzzco has a large heavy duty scanner in which I don't remember the name but it did a similar function as my Epson.
It's important and MUCH faster when each time you open the scanner interface that it automatically shows where it last scanned. My Epson however when I scan, the scanner interface doesn't disappear. Which means less clicks or buttons to reboot the scanner interface and to just keep feeding the computer. The only downside is having to compile each of the separate files after ward using copy/paste to the base picture. More on this subject later.
Photoshop
Anyway. What you could do in Photoshop is use the animation feature to create an animation of your test. I played a little with it and I find that it's a MUCH simpler version of the After Effects time line. Just like in After Effects, you can make animations either by stacking blocks or by using the Opacity tool. Unless you specify that this is a video document, the default frame rate will be 30. You can change this by the drop down menu on the far right of the animation panel and selecting Document settings. You can also toggle Hold interpolation on key frames. The only down side is that the short cut keys of AE don't work and you have to change Opacity in the layers panel, Position in main window, and style in the style window instead of a drop down for value. I'm spoiled by AE I like less clicking
If you are more comfortable in After Effects, you can always forward the PSD into After Effects and work there. It's probably much better there anyway as the frame rate is more accurate there then in Photoshop.
My animation test had 4 pictures in it (created a loop) on 2s at 30 fps. Photoshop after rendering could still only do 10.38 frames per second. That's OK if you just want to see if the animation reads but not if you want to see it in real time.
Premiere
Premiere is an odd program to me. What's nice about it anyway is that if you are using a lunchbox and you have the computer hooked up to the lunchbox, you can pencil test on the lunch box and then have Premiere record as if a VCR. Premiere also has a feature called Stop Motion. This is best for if you are using either a MiniDV or a WebCam. Pressing the space bar has the computer capture one shot of the animation and allows you to replace pictures before taking the next shot. I like it because you can view instantly and render it into a quicktime file. Only problem is with it is that it literally acts like a lunchbox that you will need a light box under you animation and include all layers or paper.
MonkeyJam
Is the best, quick and easy pencil tester in my opinion. As I mentioned with the scanner, it's beautiful with both camera options. You can make layers of each layer of animation and monkeyJam automatically multiplies them on top of one another. It also displays Xsheet numbers (limit 260 frames) . Changing how long a picture is held is also easy as it's mosty just dragging down the pictures. Monkey Jam also saves each of the pictures you create with it, giving it the name of the layer and the number picture or sequence number it has. You can specify the format too. The other thing you can do is to tell Monkey Jam where you want it to save each pictures. MonkeyJam saves it's xsheets so you can reupload your tests and easily re-edit it. Most exporting of movies are window format I believe but does allow for whatever compression you have installed on your computer. I can go on on how easy it is to use Monkey Jam. Plus it's Free.
Learn to flip
If you can't afford any of these, learn to flip your drawings! That's what I did since someone stole my pencil tester. They stole it just before I started animating! If you can help it, don't rely too much on a machine to let you know your animation is working! Trust your instincts. Refer to Richard Williams: Animator's Survival Kit on that jazz.
Anyway. I'm looking for other animators that would like to add on their two cents on how they prepare for an animation. Each projects has their own quirks afterall. If anyone would like to add their own articles, please contact me :)
Tuesday, April 21, 2009
Preparing yourself for an animated film
I'm an animation senior about to graduate SVA named Carly Crawford.
I’m creating a series of tutorials primarily for my undergraduate classmates of School of Visual Arts that have to do their thesis films for next year. I think it will definitely help others as well though. I found that the preparations I made benefited me greatly for a nice stream line way to work. I will be showing the tools I have gathered for minimal costs and how to be self sufficient if you don’t live in the dorms of your school.
So what are the basic needs of an animation?
Animation disk and table
Pencil tester
Hole puncher
Animation paper
Field guide
Film bible
Substitutes that are not as expensive:
Light box (that angles for comfort) with a taped on pegbar. (I highly recommend the Aluminum Acme bar and several plastic bars around)
Ordinary hole puncher (if you do this, you will need lightfoot pegbars)
MiniDV camcorder with either a tripod or the Cam stand http://www.photocopystand.com/
Printer paper
Paper print out of field guide
Digital process.
A tablet enabled computer (I use Toshiba M7 tablet PC)
External hard drive (mine is NTSF)
USB data stick (mine is FAT32) [makes for file sharing with Macs]
Misc. stuff
Laptop stand (Xbrand 360° Height Adjustable Laptop Stand)
Air conditioner or fan
Programs I use:
Celtx (Free)
Sketchbook pro
Photoshop CS4
After Effects CS4
Final cut pro (Mac only)
Monkey Jam (Free, PC only)
I’ll make future installments about the substitutes for basic animation. In this installment, it’s more about when you are getting it on the computer.
RULE #1 BACK UP EVERYTHING. I really hate having to say what others have said but it’s true: Save frequently, back up your things. Trust me. When it comes to movies, EVERYTHING GOES WRONG at one point or another and thus you have to be prepared for any stupidity.
Ways to prevent losing your data and wanting to kill yourself:
1. DON’T SAVE ON YOUR DESKTOP/LAPTOP’S HARDDRIVE! You will lose it! And it will bog down the performance of your computer because the files you will create will be huge.
2. DON’T USE THE EXTERNAL HARDDRIVE YOU HAVE BEEN FOR GOD KNOWS HOW LONG! Buy a whole new one that is compact and sturdy. A good 280 Gig should be enough. I personally use the Maxtor Onetouch 4 mini. I like it because there is a space I can put a stick for labeling. It’s also very easy for travel with. My other external hard drive did die on me around January.
3. DO USE AN FTP SERVER. I’m serious. Buy or bum off a friend an FTP server, hook up Version Cue/Adobe drive to it and back your stuff up on it. That or download Smartftp to access your ftp server. The nice thing about an FTP server is that if you have people helping you, they could download your files to their computers, work on it and resubmit it in a separate folder that a second screen name has limited access to, thus preventing people from saving over or deleting original files.
RULE #2 UPDATE YOUR EQUIPMENT, INCREASE PERFORMANCE. Really, honestly. You’re making a movie. You will need more then 2 gigs of RAM and 80 gigs of space. For the longest time I was working on my PC laptop that was so slow and often gave me error messages of not being powerful enough to render. I thought this was weird because I had up my RAM to 4 Gigs just before the year started. Turned out my hard drive was failing and needed to be replaced. So when I took it to the shop and they told me of the signs of death it was giving, I replaced my hard drive from 80 gigs to 160 gigs. With all of the other repairs (DVD replace, Wifi button fixed, keyboard replace) I got a sweet deal and with out warranty! Also I came into some money shortly after and I had to update my Flash program for class. I ended up buying the Adobe production suite with the student discount. With all the programs it was well worth it.
With an updated computer, you are less likely to freeze and programs to close on you. A nice place to go to check your computer's performance is PC Pitstop . Be good to your machine :3
RULE #3 SAVE SAVE SAVE!!!! Save every time you do a major change! Set After Effects to save every 15 minutes! (It's in the preference under file) Photoshop doesn't have an auto save, so save save save!
Managing your files and documents: ORGANIZATION IS KEY
Know where everything is. A movie is way too complicated for someone to go in without a plan.
Celtx is helpful because it can keep all of your documents together and help you create for film bible. Its primary function is script writing. How ever you can create a storyboard document in which you can print out thumbnails for your film bible. Also you can store information on your characters, your voice actors with contact info, production calendar and other important documents. You can even import other documents and files in which it will create a quick link so you don’t have to look for it. I’ll write about film bibles later. What’s also nice about Celtx is that it has its own FTP site for you to upload to.
The categories for my folders
Animated Scenes
Colored Animated Scenes
Characters
Elements
Resource pictures
Inspiration pictures
MonkeyJam
Separates
Storyboards
Layouts
Title and credits
Videos
Animated scenes are later, but this is where you would put PSD files and AE files of uncolored but fully animated stuff. For color people, I like to name the files in this format : SceneXcharacternames that way I know what color pallet I need.
Colored Animated scenes are for the colored. I’ll explain what to do with these later in relation to the uncolored work. These files should retain the same document name and layer names as their predecessors of the animated scene files. This is because in AE, you would be replacing the uncolored with the colored.
Characters- Character sheets and master color pallets.
Elements- maybe extra things like minor ensemble characters, stars, special effects.
Resource pictures- If you don’t know how to draw something, for god sake look for photo refs and save them.
Inspiration pictures- These are illustrations you create to figure out the color scheme and feel of your film. In no way does it have to be anatomically correct or life-like, but give you an idea of the visual direction of your film.
Monkeyjam- needs its own folder. When you take pictures with it, it likes to splay all the pictures on your desktop. Use this folder to keep them all together and for future ref.
Separates- I thought you guys would probably be going Huh? What? This is another form of protection your data. Instead of just storing all of your animated layers in one Photoshop document, separate them all into individual jpeg files. It’s easier then it sounds because Photoshop has a script in which it can export its layers into individual bits. 9.9 I didn’t do it for scene 6 and lost my lip-sync. Had to do it over. Luckily I had rendered a video with the lip-sync on it and imported the video to Photoshop. I spliced it out until I could redo the lip-sync later. It’s good practice to create separate folders for each scene.
Storyboards - I love using Sketchbook pro for my storyboards, especially because it’s so easy to “flip pages” as it was an actual book. Makes reading very easy. When creating a storyboard, it’s best to take a template resave is as the title of your film. After you finish drawing the first page, hit SAVE AS and it will create a title name with the title of your fillm0001. Each time you need a new page, open up the template and hit SAVE AS before you start working. Doing this allows Sketchbook to know that these are a sequence and to treat it as a book.
Within this folder you should have a subfolder of separates in which you use Photoshop to slice each panel up so that it’s easy for you to composite in After Effects and Celtx. More on that later.
Layouts - Layouts are your guides to the final product of your animated films. This folder has to be separate from animated files. A major reason is scanning. That pegbar you put on your scanner is bound to move at one point or another unless it’s glued on. Also unless you scanned the entire page, you will not create the same selected area. It isn’t happening. Plus, you leave this up so that when you need to go back and look at your layout file, After Effects can find it all.
Title and credits- was the last folder I made. One note I can make besides the obvious: When creating your credits, create two Photoshop versions. One that editable with everything separated, and a second one with them all merged together so that AE doesn’t have a hard time with placement. Be careful and mindful when using this method. Edit in the editable one and SAVE AS to the second one.
Videos - You are going to be rendering films up to the wazoo with After Effects and possibly MonkeyJam. Be sure that when you save these videos that you give a name and add the date. For example: My AE file is called Roughmater. Each of the videos I render are called Roughmater2.23.09 or Roughmaster02.22.09. If you make more then one in one day, you could render over the first one or just rename it with the same date.
After Effects is your friend when you ORGANIZE ORGANIZE ORGANIZE!!!
Everyone knows the project window. It’s a force to be reckoned with because it’s so damn hard to keep organized. Yes, there is an internal search engine, but if you have to rely on it excessively… You have a problem. Not to mention, if have too many things in the project window, the computer starts to slow down… So I have a system: Break it down :3
1. Create each scene in its own separate AE file. You already know how long the scene is supposed to be. You know the frame rate, you know the size aspect. In this way all your computer has to think about are the elements of that one scene.
2. Create a file in which you would string all of these files together. After Effects can import other project files. Which is good because when you import them, they create folders will all of their goodies in them. Use this file to ONLY do minor edits on individual scenes. Such as shortening and lengthen sequences. If you need to do more intensive work, just open that particular AE file.
WARNING: When importing project files, make sure no other folder is selected at the time of import or the new project will appear inside of the selected one. This can be troublesome when folders are collapsed.
3. If the computer is getting stuck on a really large scene, which they do, open the original scene and render out a QuickTime of that scene and replace project file in master file with the movie.
When final rough cut is done and coloring begins:
4. Create duplicates of uncolored AE files into the colored files. If you are having trouble commanding AE to replace whole files with the new colored one:
A. Import new files.
B. Select desired composition where files need to be replaced.
C. Select the file you want to replace within the timeline
D. Drag file you want to replace with while holding the ALT key. This will not only replace the file but also give the new file the same attributes as the former one.
5. Since you have the exact timing now because the rough cut is done, it is safe to create an uncompressed QuickTime without sound of each scene to be imported to the new Final master AE. This will create a small and manageable file for additional editing. Of course these files can also be imported to Premier CS4 or Final Cut Pro for final sound edits and printing to video.
As a major tip:
Get a laptop stand. If you are using a laptop. Why? Because it keeps your laptop off the table so it doesn’t overheat as quickly. Also with angling abilities, it’s less stress on your back and neck. Animators are prone to back problems, we don’t need the computer to add to that! It’s also a lot easier on you when you are using a tablet PC like mine for the same reason. This way the screen is angled comfortably for me to get in there and draw.
When rendering out a really large file in AE, It’s a good idea to prop your laptop to a large fan or small air conditioner. Why? Because it will cook itself, and suddenly forget what it’s doing and crash on you!!! OH TEH NOES! It’s like… having your computer concentrate less on it’s cooling system. Makes for a happier, healthier and faster computer :3 I’ve saved my computer from freezing on me by doing that. It came back once it cooled down.
Subscribe to:
Posts (Atom)